Часть 6.
Block A: 54-40 or Fight!
For the SMALL quilt, Make 24 blocks.
For the LARGE quilt, Make 60 blocks.
Press seams AWAY from the star points units and toward the 4 patch units. Keep all of your oranges in the 4-patches going the same direction!
Birthday Girl Block from 100 blocks Vol 2!
You may remember my block in a 12” size being featured in Quiltmaker Magazine’s 100 blocks by 100 designers, vol 2! I’ve always loved this block, and here it has found a place to play!
For the Small Quilt, Make 25 blocks
For the Large Quilt, Make 61 blocks
Press seams toward the chevron units and away from the split triangle corner units.
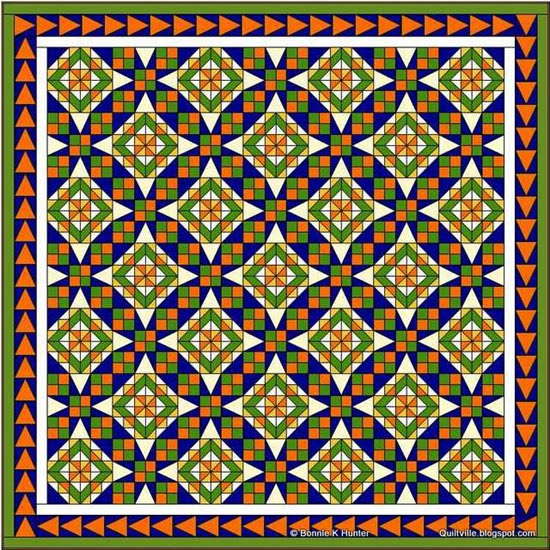
Quilt center assembly:
75” X 75” version
114” X 114”
Our orange/blue tri recs units become our border!
Join the blocks into rows, and join the rows to complete the quilt center. Press.
For SMALL quilt cut 8 strips 2” wide from neutral print, cutting strips across the fabric from selvage to selvage.
For LARGE quilt, cut 10 to 11 strips 2” wide from neutral print, cutting strips across the fabric from selvage to selvage.
Join the border strips end to end on the diagonal to make one long length of border. Trim excess 1/4” beyond seams. Press seams open.
Lay the quilt center out on the floor, smoothing it gently. Do not tug or pull. Measure the quilt through the center from top to bottom. Cut outer borders this length. Sew the side borders to the quilt sides with right sides together, pinning to match centers and ends. Ease where necessary to fit. Press seams toward the borders.
Repeat for top and bottom borders, measuring across the quilt center, including the borders just added in the measurement. Cut top and bottom borders this length. Stitch the top and bottom borders to the quilt center, pinning to match centers and ends, easing where necessary to fit. Press seams toward borders.
Pieced Border:
Small Quilt:
Side pieced borders: 22 units each
Top & bottom pieced borders: 24 units each
Large Quilt:
Side pieced borders: 34 units each
Top & bottom pieced borders: 36 units each
Join side border units end to end, and join to quilt paying attention to the way the arrows point. Press seam toward inner border.
Join top and bottom border units end to end, paying attention to the end units forming the border corners and the way they turn. See diagram. Join Top and bottom borders to quilt, pressing seams toward inner border.
Outer border:
For LARGE quilt, cut 11 strips 3.5” wide from neutral print, cutting strips across the fabric from selvage to selvage. Join the border strips end to end on the STRAIGHT GRAIN to make one long length of border. Trim excess 1/4” beyond seams. Press seams open.
*Note* when strips are 3-1/2" or wider I tend to join them end to end on the straight grain rather than on the diagonal due to fabric waste, and the fact that a diagonal seam is longer than a straight butted one and becomes more noticeable the wider the border gets. Feel free to join these on the straight if you don’t want a LOT of large cut off triangles to deal with later. If you DO join the 3-1/2” strips on the diagonal, take note that you might need to cut a couple of extra strips to make up for the waste created by sewing on the diagonal.
Lay the quilt center out on the floor, smoothing it gently. Do not tug or pull. Measure the quilt through the center from top to bottom. Cut outer side borders this length. Sew the side borders to the quilt sides with right sides together, pinning to match centers and ends. Ease where necessary to fit. Press seams toward the outer borders.
Repeat for top and bottom borders, measuring across the quilt center, including the borders just added in the measurement. Cut top and bottom borders this length. Stitch the top and bottom borders to the quilt center, pinning to match centers and ends, easing where necessary to fit. Press seams toward outer borders.
Ta-Da!!!
Dad and I hanging the quilt over the upper deck railing at Quilt Villa over Thanksgiving!
Over the split rail fence on a sunny afternoon!
Quilting in Progress!
Remember my blogging about finding a GLARING mistake while quilting during my brother’s brain cancer ordeal and reflecting:
There are a couple mismatched seams that I would call "GLARING”. And I’m not fixing them. They are quilted in. Those are the spots where my heart got derailed.
Some future “quilt inspector” may tsk tsk at the inaccuracy of those places, the wobbly-ness of seams, the chopping off of a few points.
But I will know when I see these humble places that at that moment –seams went awry while sewing through a veil of tears and much heart-trembling.
This is how we hold it together. Sometimes, just like life –Quilts are just a beautiful mess, and we just keep quilting on while trying to hold on to our sanity.Don’t worry about your quilt not being PERFECT. Mine certainly isn't….LOOK:
Really off! Quilting through bad news –and quilting through good!
Mark is now 1/2 way through his radiation and chemo and we are hopeful! And we keep quilting on!
Celtic Solstice is quilted with a lovely design by Urban Elementz called Celtic Curlz! How perfect!
Happy 2014, Everyone!
On the bed at Quilt Villa! PERFECT Size!


Комментариев нет:
Отправить комментарий